 |
Sudoku-Help-Plus Worked Example
|
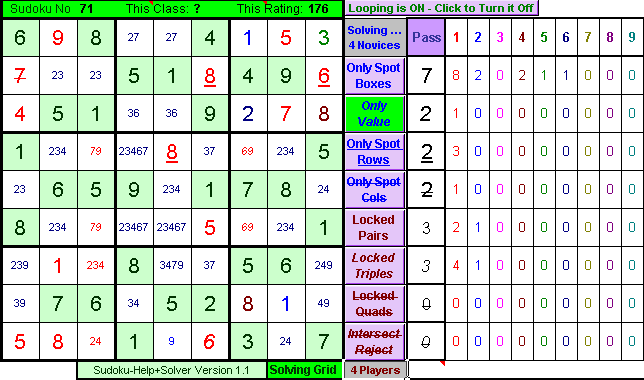
Sudoku-Help+ Puzzle No 71 (which appeared in mX as Puzzle No 10) is my puzzle construction masterpiece. It looks simple enough at first glance with 30 given values and a number of cells whose values can be immediately placed with the most obvious of the Novice class solving rules. Application of a couple of the Player class elimination strategies enables the placement of values in a few more cells, and then you get stuck. To actually unlock the whole puzzle and solve it with pure logic from that point on requires the joint application of 3 different Expert class elimination techniques just to place the next value, from where the puzzle falls out easily.
To get most value out of this tutorial in solving Sudoku it is strongly recommended that you attempt to solve the puzzle independently yourself first. If in doing so you get to the point where you have placed all the certainties and used Locked Triples and Locked Pairs to solve a few more, and then you are stuck and don't know where to go, you will probably be bored by the first part of the tutorial and should skip ahead to this point, which in all likelihood is the very point you have reached with your own solution. I hope you find this tutorial instructive. Regards Greg Shalless |
|
Sudoku-Help+ - Novice Class Rules - Only Spot Boxes:
Red Circles show 1st pass placements possible with this Rule. The 7 encircled in mauve is really a 2nd pass placement but can be done on the 1st pass because 5 has already taken the only other spot in that box a 7 could go. Similarly on the 2nd Pass, the placement of 1 in the bottom right Box is really a 3rd pass placement but can be done on the 2nd pass because the placement of 1 in the top right Box (because 5 now occupies the only other spot there that 1 could go), has already happened by the time we get down to look at the bottom right Box thereby knocking 1 out as a candidate in cell (8, 7). To further emphasise how we can draw these conclusions from a pure logic perspective, the placement of the 5s is highlighted by showing you how the existing 5s (olive green background) prevent all but one cell in each of 3 Boxes from taking the value 5.
Move the Mouse Over the picture to see what Sudoku-Help+Solver does. |
 |
|
Sudoku-Help+ - Novice Class Rules - Only Value:
The Red Circle shows the only cell where this rule applies. Unfortunately it doesn't lead to further solved cells. Move the Mouse Over the picture to see what Sudoku-Help+Solver does. |
 |
|
Sudoku-Help+ - Novice Class Rules - Only Spot Rows:
The Red Circle shows the only cell where this rule applies initially. But once the 6 is placed another cell in that row is the only cell in which 8 can go (encircled in mauve), which in turn leads to the placement of another 8. To further emphasise how we can draw these conclusions from a pure logic perspective, the placement of the 6 is highlighted by showing you how existing 6s (olive green background) prevent all but one cell in Row 2 from taking the value 6.
Move the Mouse Over the picture to see what Sudoku-Help+Solver does. |
 |
|
Sudoku-Help+ - Novice Class Rules - Only Spot Cols:
The Red Circle shows the only cell where this rule applies. Unfortunately it doesn't lead to further solved cells. To further emphasise how we can draw these conclusions from a pure logic perspective, the placement of the 7 is highlighted by showing you how existing 7s (olive green background) prevent all but one cell in Column 1 from taking the value 7.
Move the Mouse Over the picture to see what Sudoku-Help+Solver does. |
 |
|
Sudoku-Help+ - Player Class Rules - Locked Triples:
It is not possible to solve any more of this particular puzzle without resorting to some sort of elimination technique. The simplest of these is the Locked Pair but no opportunties for elimination by this rule are yet present, however there are a couple of instances of Locked Triples highlighted by the Red Circles. Because both these Locked Triples appear in Boxes in which there are 5 unsolved cells, they necessarily reveal a Locked Pair, which would also have been revealed by the Hidden Pairs Rule. Watch for the 3rd Locked Triple instance which arises as a consequence of the first 2. One would not do this elimination oneself because the associated Locked Pair is easier to spot, but when Looping is on the Solver exhausts all possible eliminations by the particular rule before allowing you to choose another. Move the Mouse Over the picture to see what Sudoku-Help+Solver does. |
 |
|
A number of the Novice Class Rules can now be deployed to solve some more of the puzzle. The pictures below show what happens using the Only Spot Boxes Rule. Move the Mouse Over the picture to see what Sudoku-Help+Solver does. |
 |
|
Sudoku-Help+ - Player Class Rules - Locked Pairs:
The Locked Pair exposed in the Middle Left Box by the preceding Locked Triple is also a Locked Pair in Column 3, the eliminations for which expose another Locked Pair in Row 9. Move the Mouse Over the picture to see what Sudoku-Help+Solver does. |
 |
|
Then the Only Value Rule will solve the obvious cell. Move the Mouse Over the picture to see what Sudoku-Help+Solver does. |
 |
Sudoku-Help+- Expert Class Rules - 2x2 Gridlock:
We have reached the point where the Certain Placement techniques (Novice Rules) and Basic Candidate Elimination strategies (Player Rules) are unable to assist us in solving any more of this puzzle. I suspect many of you who attempted to solve the puzzle yourselves before studying the tutorial managed to get to this point. We now need to deploy some of the Complex Candidate Elimination techniques (Expert Rules) to make further progress. These are mainly the nxn Gridlock Rules more commonly referred to in the literature as X-Wings & Swordfish. In its simplest form the 2x2 Gridlock Rule involves finding a candidate value present twice in each of 2 Rows (or Columns) such that the cells involved are also members of the same 2 Columns (or Rows), wherein one of those 2 cells in those 2 Columns (or Rows) must contain the value, in which case the value can be eliminated from the other cells in those Columns (or Rows). The Red Circles show such a situation.
You will also see for the first time in this tutorial the Sudoku-Help+Solver's Elimination Grid where it records all its candidate eliminations. Users can record their own eliminations in this Grid (after which they should click the "Update Candidates" button to update the Solving Grid accordingly).
Move the Mouse Over the picture to see what Sudoku-Help+Solver does. |
 |
Sudoku-Help+- Expert Class Rules - 3x3 Gridlock:
Most truly "difficult" Sudoku puzzles are unlocked by the application of one Expert Class solving Rule, but not this one. The previous eliminations do not enable us to solve or make further eliminations from any other cells. We are still stuck. Fortunately the 3x3 Gridlock Rule can be applied to make some further eliminations. The Red Circles show the cells identifying the pattern, whilst the Pink Circles show the other cells in the 3x3 Grid. The mauve underlined numbers are the ones that can be eliminated as a result.
Move the Mouse Over the picture to see what Sudoku-Help+Solver does. |
 |
|
The n x n Gridlock Rules can be very difficult to spot (especially the 3 x 3 and 4 x 4). To assist with spotting them the Sudoku-Help+Solver has a "Particular Candidate Grid" that enables you to apply a filter to see chosen candidates in isolation (or n at a time if you wish, although that wont help you in this situation). The pictures below show this grid, before we applied the Expert Rules above, isolating the 2s and the 3s. This makes it much easier to spot these two n x n Gridlock opportunities. |
 |
 |
Sudoku-Help+- Expert Class Rules - XY-Zap:
Despite all those n x n Gridlock eliminations, it is still not yet possible to make any further progress towards the solution. However those eliminations have set up a situation where the XY-Zap Rule applies. In this rule you are looking for three pairs of candidates (xy, xz & yz), such that regardless which value xy takes, one of either xz or yz must be z, meaning that cells on the intersection of the cells occupied by xz and yz cannot be z.
The Red Circles show the x (4) in xy (47) and the z (3) in xz (34) that would be a consequence of xy (47) being 4, whilst the Blue Circles show the y (7) in xy (47) and the z (3) in yz (37) that would be a consequence of xy (47) being 7. The cell on the intersection of xz and yz from which z (3) can consequently be Zapped is shown by the mauve circle. Study the before and after images below to see if you can see how the Sudoku-Help+Solver was able to make the other two eliminations it made by the XY-Zap Rule.
Move the Mouse Over the picture to see what Sudoku-Help+Solver does. |
 |
Phew! After all that hard work we can finally solve some more of the puzzle. In fact, the rest of the puzzle falls out fairly rapidly from here and any of the Novice Class Rules would probably do the trick. I chose Only Spot Cols.
Move the Mouse Over the picture to see what Sudoku-Help+Solver does. |
 |


